The Seeed Studio XIAO ESP32C3 is an ultra-small, compact, and small IoT development board built around the Espressif ESP32-C3 WiFi/Bluetooth dual-mode chip. The ESP32-C3 has a 32-bit RISC-V CPU, along with an integrated Floating Point Unit (FPU), providing highly efficient 32-bit single-precision arithmetic. It finds suitable applications in demanding computational intensity. It has excellent radio frequency performance, supporting the IEEE 802.11 b/g/n WiFi protocol and Bluetooth 5 (LE). It also has an external antenna that will increase the strength of the wireless signal, making it ideal for various IoT projects.
This board comprises a very compact yet very efficient design with single-sided surface mounting components, through which one can easily combine it in projects. It has highly rich connectivity options that will include 11 digital I/O which supports PWM and 3 analog I/O pins. In addition, it supports UART, I2C, and SPI communication interfaces and even comes with dedicated reset and bootloader mode buttons. Although it integrates quite well with the Grove Shield for Seeeduino XIAO and Seeeduino XIAO Expansion board, the latter does not possess SWD spring contacts.
Given these characteristics, the XIAO ESP32C3 can be stated as a high-performance, low-power, and cost-effective solution for IoT and wearable applications.
Features:
- Powerful CPU: ESP32-C3 is a single-core, 32-bit RISC-V processor operating up to 160 MHz.
- Full Wi-Fi Subsystem: Conforms to IEEE 802.11b/g/n and supports station, softap, and promiscuous modes.
- Bluetooth LE Support: Fully supports Bluetooth 5 and the capabilities of Bluetooth mesh.
- Ultra Low Power: Quorum uses approximately 43μA in deep sleep mode.
- Better RF Performance external RF antenna will contribute a lot to its overall communication.
- Battery Management: It has a built-in chip for charge and discharge management of lithium batteries.
- Enough RAM: It contains 400 KB of SRAM and 4 MB of onboard flash.
- Small footprint – the board only measures 21×17.8mm in size, so great for wearables and other small projects.
- Security Available Reliable Security: AES-128/256 cryptographic accelerators, Hash, RSA, HMAC, and secure boot.
- Rich Interfaces: It uses I2C, SPI, UART, 11 GPIO (PWM), 4 ADC pins, and one JTAG bonding pad interface. Surface Mount Design: Single-side components for easy installation.
Specifications Comparison
| Item | XIAO ESP32C3 | Seeeduino XIAO | XIAO RP2040 | XIAO nRF52840 | XIAO nRF52840 Sense |
|---|---|---|---|---|---|
| Processor | ESP32-C3 @160MHz | SAMD21 @48MHz | RP2040 @133MHz | nRF52840 @64MHz | nRF52840 @64MHz |
| Wireless Connectivity | WiFi & Bluetooth 5 (LE) | N/A | N/A | Bluetooth 5.0/BLE/NFC | Bluetooth 5.0/BLE/NFC |
| Memory | 400KB SRAM, 4MB Flash | 32KB SRAM, 256KB | 264KB SRAM, 2MB Flash | 256KB RAM, 1MB Flash | 256KB RAM, 1MB Flash |
| Built-in Sensors | None | None | None | None | IMU & Microphone |
| Interfaces | I2C/UART/SPI | I2C/UART/SPI | I2C/UART/SPI | I2C/UART/SPI | I2C/UART/SPI |
| PWM/Analog Pins | 11/4 | 11/11 | 11/4 | 11/6 | 11/6 |
| Onboard Buttons | Reset/Boot | None | Reset/Boot | Reset | Reset |
| Onboard LEDs | Charge LED | None | RGB LED | 3-in-1 LED & Charge | 3-in-1 LED & Charge |
| Battery Charge Chip | Built-in | None | None | BQ25101 | BQ25101 |
| Programming Languages | Arduino/MicroPython | Arduino | Arduino/MicroPython | Arduino/MicroPython | Arduino/MicroPython |
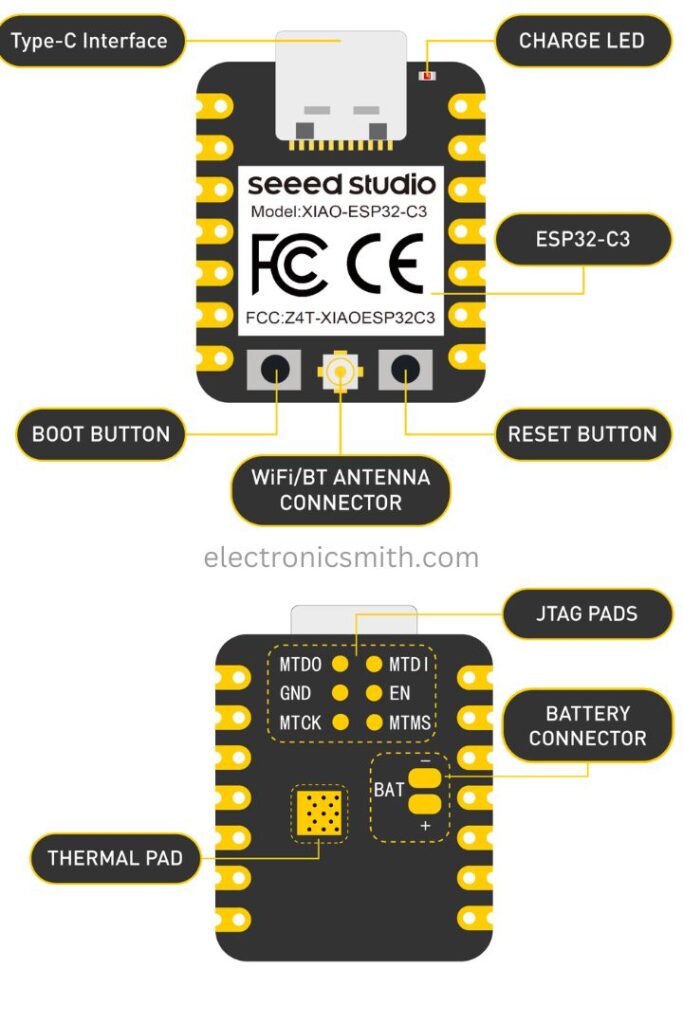
Hardware Overview
Seeed Studio XIAO ESP32C3 Pinout Diagram
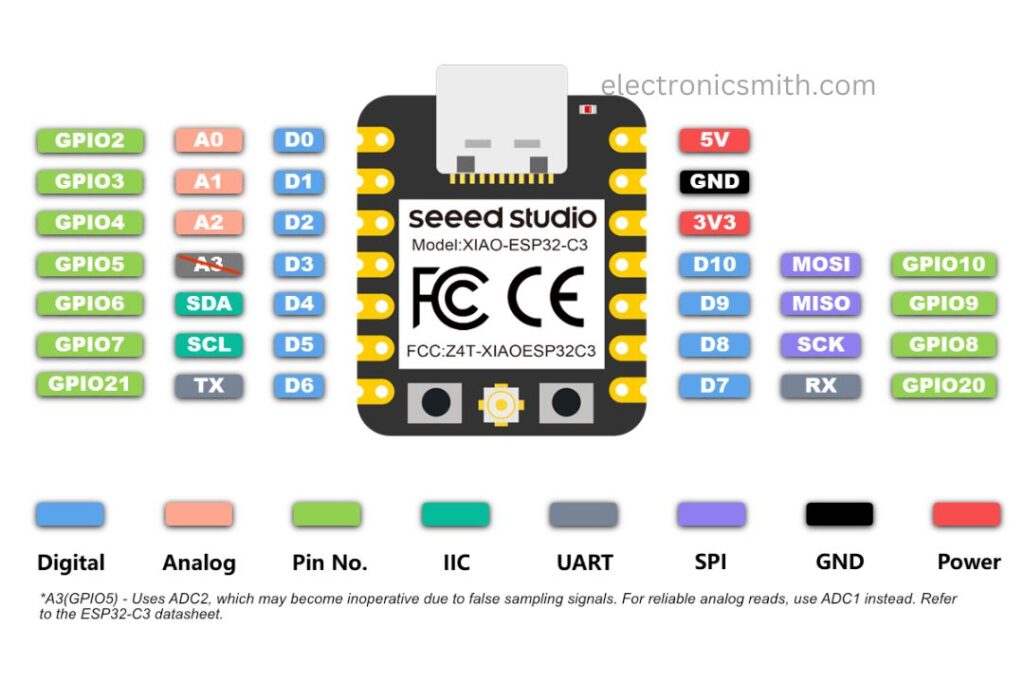
Component overview
Power Pins:
5V: This pin outputs 5V from the USB port or it acts as an input with a diode-anode to the battery, and cathode to the 5V pin.
3V3: The pin outputs a regulated 3.3V. It can supply up to 700mA.
GND: Common ground for power, data, and signal.
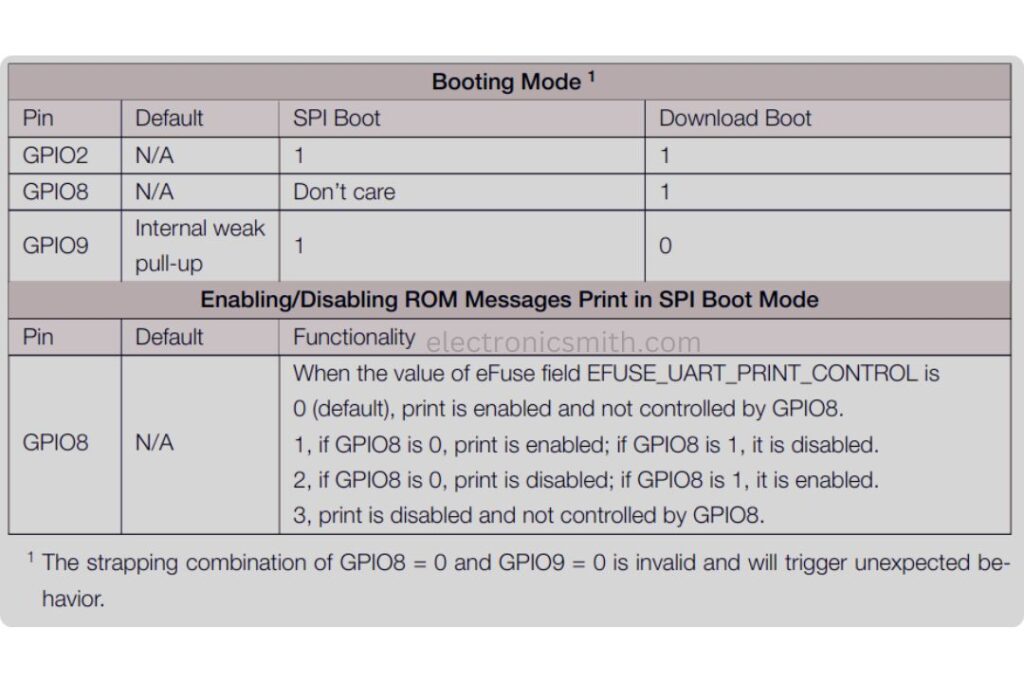
Strapping Pins:
GPIO2, GPIO8, and GPIO9 are strapping pins. They can cause failure of uploading and execution of code on the board if configured improperly. So, treat them carefully.
const int led = D10;

void setup() {
  pinMode(led, OUTPUT);
}

void loop() {
  digitalWrite(led, HIGH);
  delay(1000);
  digitalWrite(led, LOW);
  delay(1000);
}
Upload this code to the board. The LED will blink at an interval of 1 second, verifying that the setup is successful.
Strapping Pins
According to the ESP32C3 chip manual GPIO2, GPIO8, and GPIO9 are identified as strapping pins. It is possible that the configurations of high or low levels on these pins can help the chip switch between various Boot modes. So when using these pins, one must be careful because wrong configurations might cause problems when your XIAO can’t upload or execute a program.
Getting Started:
First, we will connect the XIAO ESP32C3 to a computer, attach an LED to the board, and upload a simple code using the Arduino IDE. This will verify if the board is working by making the connected LED blink.
Software setup
Firstly, Download and install the latest version of Arduino IDE that matches your operating system.
Secondly,. Open the Arduino application.
Thirdly, Install the package ESP32 board for Arduino IDE
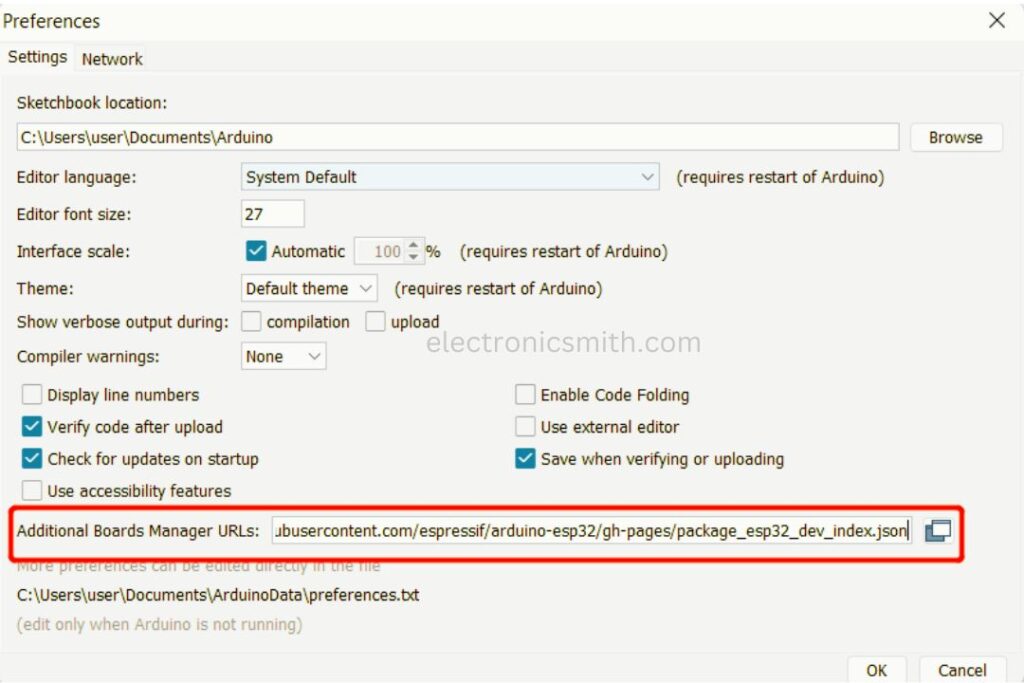
Proceed to File > Preferences. Under the section “Additional Boards Manager URLs”
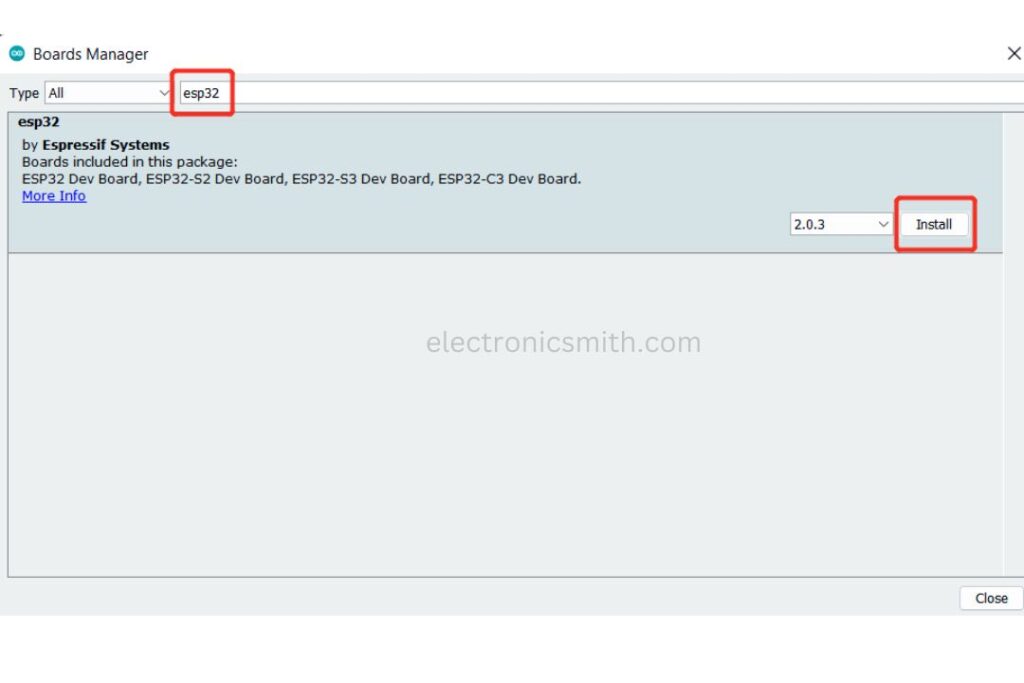
Go to Tools > Board > Boards Manager… Type “esp32” into the search box, find the latest version of the esp32 package and click Install.
Fourthly, choose the board you want to port
Board
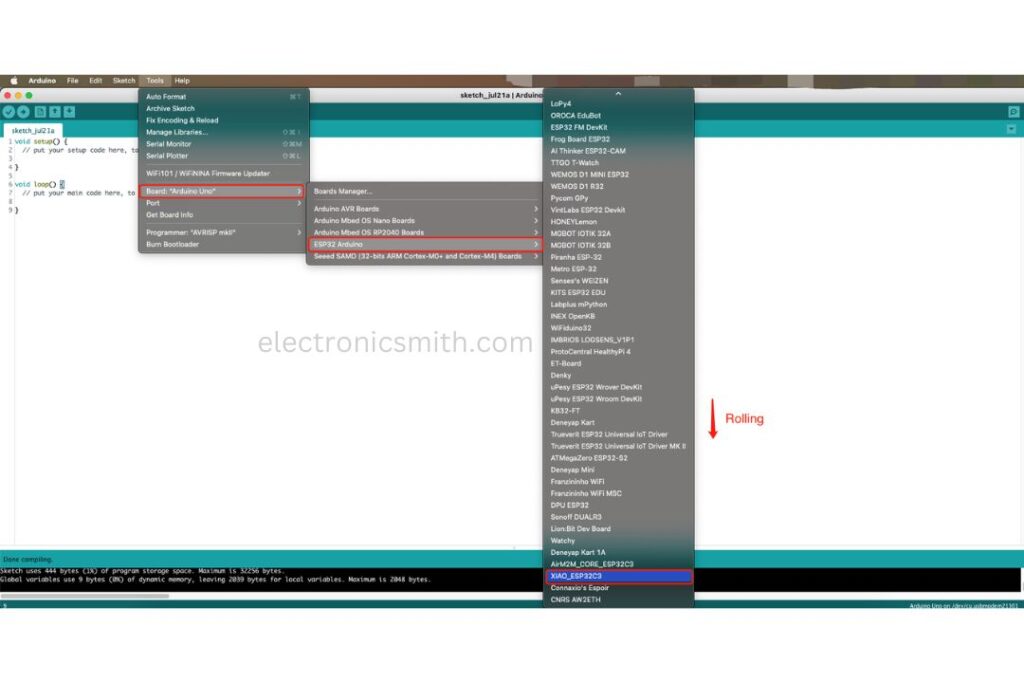
Go to Tools > Board > ESP32 Arduino, and from the list scroll down to the bottom to select XIAO_ESP32C3.
Port
Proceed to Tools > Port and select the serial port for your connected XIAO ESP32C3. This is usually COM3 or higher, since COM1 and COM2 are generally reserved for hardware serial ports.
Additional Features
Battery Usage
The XIAO ESP32C3 supports 3.7V lithium batteries. Ensure proper soldering and avoid short circuits. The board includes circuit protection and can operate safely while charging.
Deep Sleep Mode
This board supports deep sleep and GPIO wake-up functionalities, making it suitable for low-power applications. For wake-up, connect a button to pins D0-D3. Below is a simple deep sleep example:
#define BUTTON_PIN_BITMASK 0x200000000

RTC_DATA_ATTR int bootCount = 0;


void print_wakeup_reason(){
  esp_sleep_wakeup_cause_t wakeup_reason;

  wakeup_reason = esp_sleep_get_wakeup_cause();

  switch(wakeup_reason)
  {
    case ESP_SLEEP_WAKEUP_EXT0 : Serial.println("Wakeup caused by external signal using RTC_IO"); break;
    case ESP_SLEEP_WAKEUP_EXT1 : Serial.println("Wakeup caused by external signal using RTC_CNTL"); break;
    case ESP_SLEEP_WAKEUP_TIMER : Serial.println("Wakeup caused by timer"); break;
    case ESP_SLEEP_WAKEUP_TOUCHPAD : Serial.println("Wakeup caused by touchpad"); break;
    case ESP_SLEEP_WAKEUP_ULP : Serial.println("Wakeup caused by ULP program"); break;
    default : Serial.printf("Wakeup was not caused by deep sleep: %d\n",wakeup_reason); break;
  }
}

void setup(){
  Serial.begin(115200);
  delay(1000);


  ++bootCount;
  Serial.println("Boot number: " + String(bootCount));


  print_wakeup_reason();

  esp_deep_sleep_enable_gpio_wakeup(BIT(D1), ESP_GPIO_WAKEUP_GPIO_LOW);


  Serial.println("Going to sleep now");
  esp_deep_sleep_start();
  Serial.println("This will never be printed");
}

void loop(){

}