Steps to program an Arduino Board
- Download and install the Arduino IDE.
- Connect the Arduino board to the computer.
- Choose the right board from the Tools> Board (the Arduino board that you want to program)
- Again, select the right board from Tools>Port>COM port
- Verify it and upload it.
Arduino is an easy-to-use software and in this article, we’ll cover all the basics related to Arduino IDE. Like we will learn about its main functions, uploading a sketch, etc..
Material Required for Arduino for beginners
- A computer with Arduino IDE (if you don’t have one, check how to install Arduino IDE in two simple steps)
- Arduino board (I’ve used Arduino UNO)
- A USB cable
Software Layout
Open the Arduino IDE, The first page appears like this. Some text is written on it and they are mandatory functions so will appear in every new file. You can check it by pressing CTRL+N. We will discuss about it in the programming section. First, let’s go through each icon & code on the first screen.

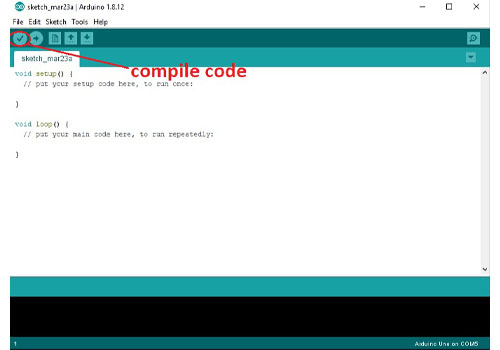
How about a deep dive into the software’s first screen. The ‘right’ symbol on the top left corner is used to compile the code. After writing the code you can check your code by click on this icon or you can use the short key CRTL+R.
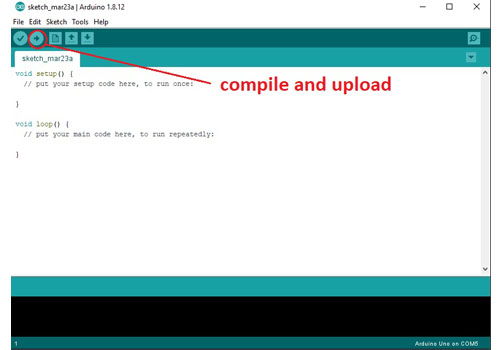
The second ‘arrow’ symbol is used to compile and upload a sketch on the board. Click on this icon or you can use the short key CTRL+U to perform this function.
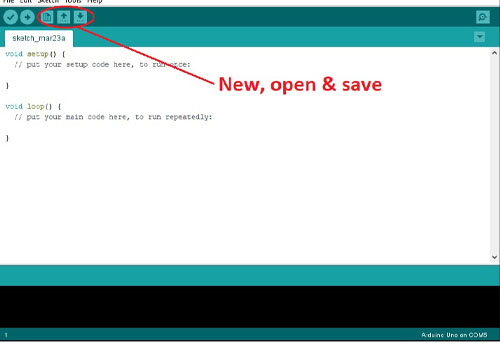
The next three symbols are the New File, Open an Old File and Save the File. These are basic options like every other software.
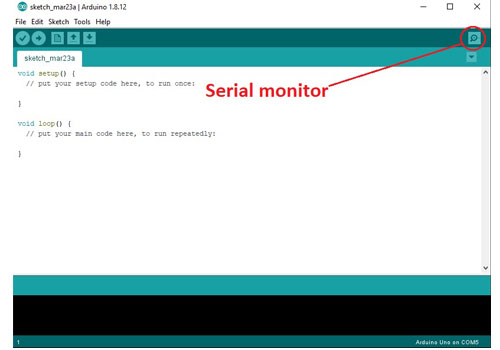
The tinny magnifying glass on the top right corner is used to open the serial monitor, that is used to communicate with Arduino boards. Ex:- You want to see the temperature using a temperature sensor. Then, the window will display real-time values that the Arduino board is reading.
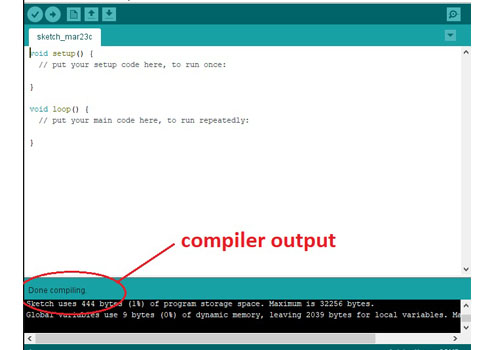
The black area is a compiler. If you have made a mistake or anything went wrong, a message will appear here.
Upload the First Code on Arduino Uno
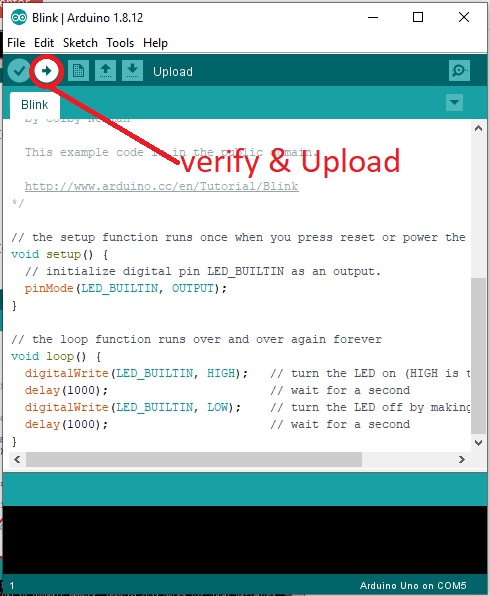
Let’s upload a code to Arduino (to show you an example). The code is already there in the software, we don’t need to write it. Go to File>Examples>01.Basics>Blink and a code will appear on your screen.

This is an example code that will turn the Arduino LED On & Off for seconds (attached to pin no. 13). The code will repeat it to infinite times.

Before uploading any code, there are two compulsory steps to be performed. First is, always select the right Arduino board, I’ve used the Arduino UNO board. Go to tools> Board> Arduino UNO.
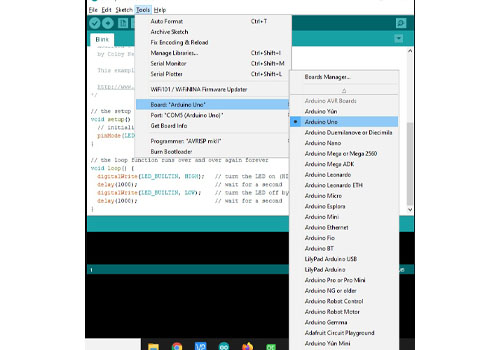
The second step is to select the appropriate comport. Go to Tools> Port>Port”No”, I’ve used COM5. The port is only visible when you connect your Arduino to your computer.

Now, verify your code by click on the Verify icon or CTRL+R.

A compiling message will display after the successful compilation. If there is an error in the code, it will display here (as shown below in the image). In my case, there are no errors as I’ve used one of the already mentioned codes.

After verifying the code click on the Upload icon or CTRL+U. The code will start uploading on your Arduino. Your Arduino must be connected to your system otherwise it will get an error.
A message will appear showing ‘Uploading Done’. This will ensure that the code is successfully uploaded on the Arduino Board.

There is an inbuilt LED on every Arduino board. And in most of the models, this LED is connected to pin no. 13. The blink output can be clearly seen through the LED.

Arduino for Beginners’ Guide completes here, now you can upload any code of your choice on an Arduino board.
Follow me on Instagram
11 thoughts on “Arduino IDE for Beginners- How to Upload Code to Arduino first time”