
You must have got this desire to switch OFF or ON your electronic device through your voice or mobile phone. Apparently, we have made it possible for you. In this article, we’ll instruct you to make your own “Home Automation System”.
Requirements for Home Automation
Hardware
| Name | Quantity |
| Arduino UNO | 1 |
| HC-05 Bluetooth Modules | 1 |
| Relay Board (4 Channel) | 1 |
| Jumper Wires | As Per Requirement |
| Smart Phone | 1 |
| 5v Power supply | 1 |
Software
| Name | Link |
| Arduino IDE | click Here |
| Application |
HC-05 Bluetooth Module

Introduction
HC-05 Bluetooth module is a powerful wireless SPP (Serial Port Protocol) based communication module.
Pinout
HC-05 have 5 pins VCC, GND, TX, RX, and Key.
| Pin | Description |
| VCC | +5v |
| GND | Gnd |
| TX | UART_TX Bluetooth Serial Sending Pin |
| RX | UART_RX Bluetooth Serial Receiving pin |
| Key | Module switch input |
If you want to know more about Bluetooth module HC-05, check out the article Connect your Phone to Arduino using Bluetooth.
Relay Module
For this project, I am using 2 channel relay module. If you want to know more about the relay module, you can check this article “Arduino relay Code, connection and control“.
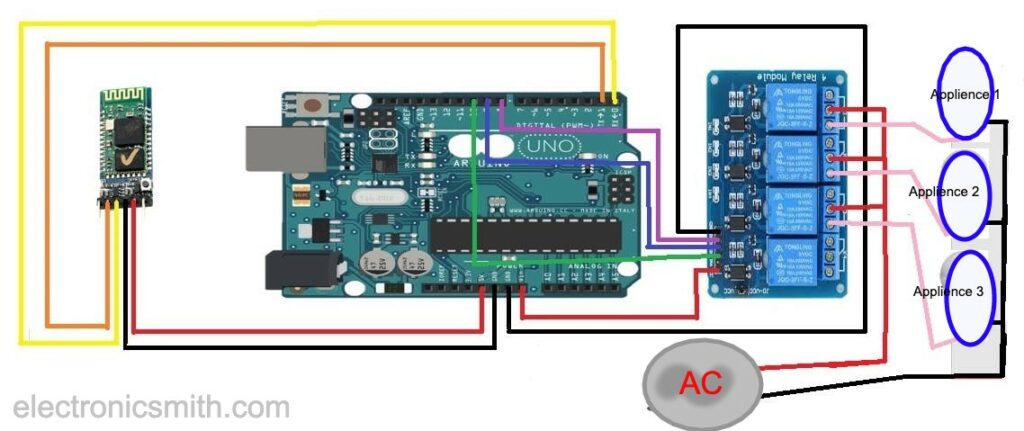
Connection Diagram for Home Automation using Arduino UNO and Bluetooth
Arduino connection with Relay
| Arduino | Relay |
| Pin no. – 8 | in. – 1 |
| Pin no. – 9 | in. – 2 |
| Pin no. – 10 | in. – 3 |
Arduino connection with HC-05 Bluetooth
| Arduino | HC-05 |
| RX | TX |
| TX | RX |
| GND | GND |
| VCC | 5v |
Code
Copy the code and paste in the Arduino IDE or simply click on the download button.
const int pin1 = 5;
const int pin2 = 6;
const int pin3 = 7;

void setup() {
  Serial.begin(9600);
 //pin define
  pinMode(pin1, OUTPUT);
  pinMode(pin2, OUTPUT);
  pinMode(pin3, OUTPUT);
}

void loop() {
  String rcvString = "";

 while ( Serial.available() )

 {    // While there is data in the buffer

   char c = (char)Serial.read();

    //Serial.println(c);

   rcvString += c;

 delay(3);

 }

if ( rcvString.length() >0 ) {
    //Serial.println( rcvString );

   Serial.flush();

    if( rcvString == "LightOn") {
      digitalWrite(pin1, HIGH);
      delay(100);
      //Serial.println("Light On");
    }
    else if( rcvString == "LightOff") {
      digitalWrite(pin1, LOW);
      delay(100);
      //Serial.println("Light Off");
    }


 else if( rcvString == "FanOn") {
      digitalWrite(pin2, HIGH);
      delay(100);
      //Serial.println("Fan On");
    }
 else if( rcvString == "FanOff") {
      digitalWrite(pin2, LOW);
      delay(100);
      //Serial.println("Fan Off");
    }

else if( rcvString == "AlarmOn") {
      digitalWrite(pin3, HIGH);
      //Serial.println("Alarm On");
      delay(100);
    }
 else if( rcvString == "AlarmOff") {
      digitalWrite(pin3, LOW);
      delay(100);
      //Serial.println("Alarm off");
    }


  }

}
Application
Download the file and unzip it. Upload the code in Arduino UNO and install the application on your mobile phone.
Steps to Pair with Application:-
- Go to settings, turn on the Bluetooth.
- You will find a new device name HC-05, now pair with it.
- The default password of HC-05 is “0000” or “1234”, enter it.
- Open Application and go to Bluetooth and select HC-05
- You are ready to use it.
Feel free to ask any questions, and put your comments below if you find this article helpful.
2 thoughts on “Home Automation Using Arduino UNO and Bluetooth”