
The TMP36 Temperature Sensor is a low-cost solution to incorporate temperature sensing into your Arduino project. These sensors are highly accurate and don’t require additional hardware. All it takes is a few simple connections and some Arduino code for temperature sensors!
Analog Devices manufactures the TMP36, a low-voltage, precision centigrade temperature sensor. You can use it in conjunction with an Arduino because of its ease of use and linear relationship between voltage output and temperature (measured in degrees Celsius).
The following are some of the possible uses for a TMP36 temperature sensor:-
- In microprocessor applications, these less expensive sensors can create interruptions.
- The TMP36 chip is used in industrial and environmental control applications to measure the average temperature.
- This gadget activates fire alarms when temperatures increase above a predetermined threshold level.
- TMP36 measures temperature in monitors, CPUs, and other power systems.
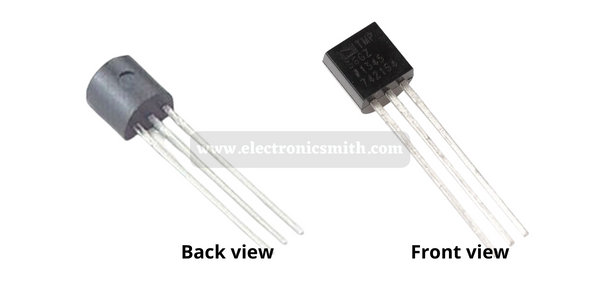
TMP36 Temperature sensor
If you’re looking for a high-precision, long-lasting temperature sensor, the TMP36 is the best choice. To top it all off, the TMP36 sensor doesn’t need to be calibrated. It has a typical accuracy of 1 degree Celsius at +25 degrees Celsius and +2 degrees Celsius over 40 degrees to +125 degrees Celsius.
In still air, the sensor’s self-heating is less than 0.1°C and consumes only 50 µA during active temperature conversions (2.7V to 5.5V). The shutdown feature can reduce the supply current to
Features
- It only needs a single power source to run.
- It can function between +2.7 V and +5.5 V.
- External calibration is not necessary because this chip is calibrated in Celsius. Over the whole temperature range, it produces an output with an accuracy of 2°C.
- The temperature range is -40 °C to +125 °C. It can, however, work at temperatures as high as +150 °C. However, precision suffers.
- The output scale factor of TMP36 is 10 mV/°C.
- In a quiescent state, less than 50 µA of current flows.
- Using a supply current of less than 50 µA results in minimal self-heating for this device.
- It is capable of shutting off on its own.
How does the TMP36 Temperature sensor work?
The temperature is measured by the TMP36 using a solid-state approach. Because the diode-connected transistor’s forward voltage – Vbe – lowers at a known rate as temperature rises, this technique uses this property. Analog signals corresponding to temperature can easily be generated by accurately magnifying this voltage change.
The fact that diode-connected transistors have a linear relationship between forwarding voltage and temperature explains why they are utilized as thermometers. This approach has been advancements throughout the years, but in essence, this is how temperature is measured.
As long as you have a TMP36, you can perform all these complex calculations. When the temperature changes, it simply produces a voltage.
Pin Out of TMP36 Temperature Sensor
To use the TMP36, connect the power (2.7-5.5V) to the left pin and the ground (GND) to the correct pin (assuming the flat side of the sensor is facing you). This will result in an analog voltage directly proportional (linear) to the temperature in °C being applied to the center pin. The output voltage versus temperature characteristic demonstrates this. Please remember that the analog output voltage is independent of the power supply.
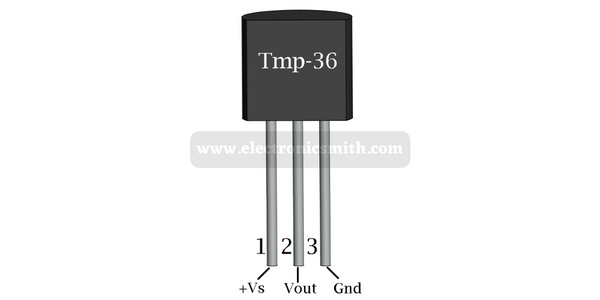
The three-pin TO-92 package, which resembles a transistor, is the most common form factor for the TMP36. Here is a glance at the board’s pinout.
- +Vs is the sensor’s power supply, which ranges from 2.7 to 5.5 volts.
- The Vout pin generates an analog voltage linearly related to the temperature. Input Analog (ADC) should be used.
- The ground pin is designated as GND.
Arduino Connection
It’s a breeze to connect the TMP36 to an Arduino. You need to connect three pins: two for power and one for reading the sensor’s reading. Both 3.3V and 5V outputs can be used for the sensor. The ground is connected to ‘GND,’ whereas the positive voltage is connected to ‘+Vs.’ Arduino A0’s analog input can be connected to a sensor’s ‘Vout’ middle pin, the sensor’s analog output. To detect air temperature, you can leave the sensor in the open air or connect it to a specific object, such as a sink.

Code
A TMP36 sensor’s temperature can be read and shown in the Serial Monitor using the following example code. Copy the code and upload it to Arduino.
// Define to which pin of the Arduino the output of the TMP36 is connected:
#define sensorPin A0

void setup() {
  // Begin serial communication at a baud rate of 9600:
  Serial.begin(9600);
}

void loop() {
  // Get a reading from the temperature sensor:
  int reading = analogRead(sensorPin);

  // Convert the reading into voltage:
  float voltage = reading * (5000 / 1024.0);

  // Convert the voltage into the temperature in Celsius:
  float temperature = (voltage - 500) / 10;

  // Print the temperature in the Serial Monitor:
  Serial.print(temperature);
  Serial.print(" \xC2\xB0"); // shows degree symbol
  Serial.println("C");

  delay(1000); // wait a second between readings
}
2 thoughts on “TMP36 temperature sensor working and Arduino connection”