
A Pi-Hole is a powerful software that blocks all kind of web ads. The Pi hole setup takes approximately 15 minutes and prevents your systems from all kinds of advertisements and malware. This software also increases your security and privacy by monitoring every website. Also, you can block any unwanted or suspicious websites. Pi hole installation and pi hole setup are discussed in this tutorial in detail.
How Pi-Hole Works?
When you open a web page in the browser, the page tells the browser to load other things like images and ads. The browser can’t differentiate between the ads and the rest of the data. Here, pi-hole comes in the role, it filters the data and further, pass the required information.
Material Required
| Material | Quantity |
| Raspberry Pi | 1 |
| Adaptor | 1 |
| SD Card 16GB+ | 1 |
Optional material for Pi-hole setup
Instead of the following material, you can Setup Raspberry Pi remote desktop using VNC Server.
| Mouse | 1 |
| HDMI Screen | 1 |
| Keyboard | 1 |
This Tutorial considers that you have a working internet connection and Raspbian installed on your Raspberry Pi.
Pi-Hole Setup Guide
- Open the Terminal window and type the below-mentioned command to install Raspberry Pi-Hole software. This is the first step for the Pi-Hole setup guide.
curl -sSL https://install.pi-hole.net | bash
It will ask a few questions and give warnings, the ones that are discussed below.

- The first instruction is about Pi-Hole automated installation. Press Ok

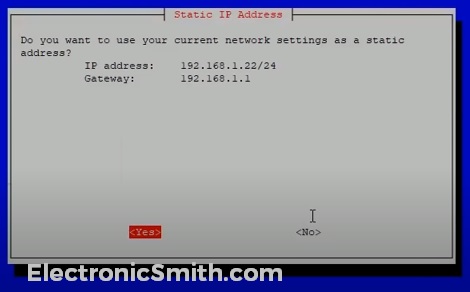
- The next option is Static IP, it will automatically assign itself a static IP. If you want to change it, you can do it later, for now, I press OK.

- Next option is to choose upstream DNS provider, I prefer to choose google.

- Generally, we use IPv4 Protocol. So, select IPv4 Block ads over IPv4. and press OK.

- On this step, you can assign a static IP to Raspberry Pi-hole. It can open pi-hole/admin using this IP address.
- FYI: IP Conflict is a warning dialog box. This case may arise when the router tries to assign the same IP to different devices. This problem generally occurs in old routers as modern routers automatically tackle this situation, so press OK.

- Admin interface is important, so select On and press OK.

- This dialog box shows your admin IP address. Use this address to access the admin panel. Ex- In my case http://192.168.1.22/admin, copy and paste it in your browser after installation.

This is the final step of how to install Pi-hole tutorial.
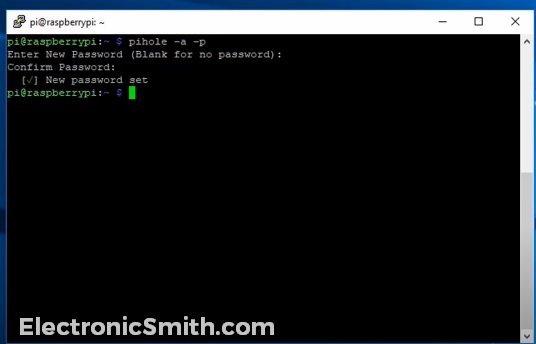
Reset Password for Web Interface
- You can update your default Pi-hole password by using the following commands-
pihole -a -p
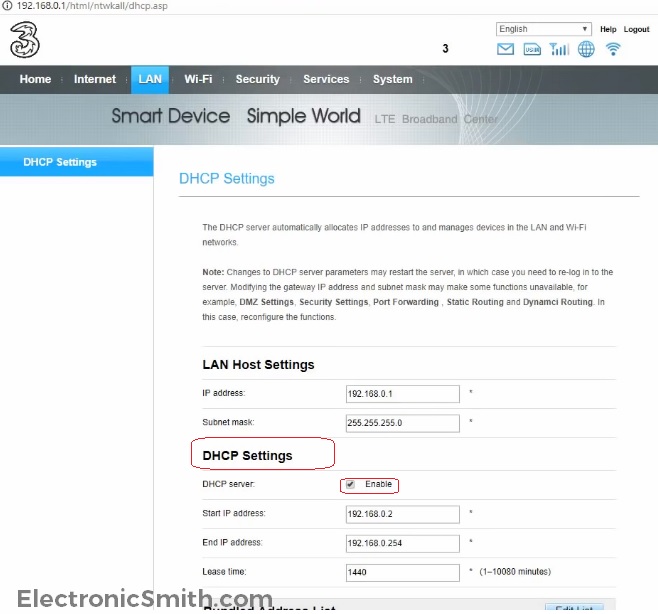
How to Setup Pi-hole With the Router
This setting is different for different routers. Search for the DHCP setting and disable it .
Test Pi-Hole Web Interface
Open the browser window and enter your Pi-Hole IP address with admin. Ex- in my case 192.168.1.22/admin/. Enter the password that you just updated.

Open settings and select DHCP. Check if the DHCP server is enable.

Here, you’re done with everything. Now, the browser is ready to block all the unnecessary advertisements.