
Octa print, created by Gina Hauge and maintained by her and Guy Sheffer. The octaprint helps in making the 3D image better than before by just adding a bit of Wi-Fi functionality to your 3D printer.
It has a really easy set up but before that, we would like to have these basic things beforehand. Let’s walk you through the procedure starting from pre-requisites for this project.
Material Required
- Raspberry Pi 3 (or updated version would do for this project)
- Micro SD card
- Raspberry Pi power adapter
- USB cable (the connector type based on your printer)
- Webcam/Raspberry Pi Camera Module (optional)
- 3D-printed camera mount (optional)
NOTE: DO not use any older version other than Rasberry Pi 3 as the results will be a failure and print will not be in the way you want it to be. The second is to make sure to process the 3D printer under an eye as the printer becomes excessively heat-full that may cause any damage.
Steps to install Octaprint in Raspberry Pi 4
Let us part the process down into steps for better understanding and easy approach-
STEP 1- Setting up OctaPi
Download the OctaPi Software’s latest version from the link below to begin the process from the official website of Octaprint or click here. It includes video streaming software, CuraEngine for slicing models, and octaprint. then, unzip the file after downloading and save the .img file handy.
Next is, we’ll use Etcher to flash this image in the Micro SD Card reason being its minimized UI, easy to use, and can work both in Windows and Mac. Download Etcher and install it. Then, select the unzipped image saved before and attach the SD card with your computer, select the middle column of the Etcher interface. In the end, click on Flash, and the image is burned into the card. All the steps are similar we did How to Install Ubuntu Raspberry Pi 4
Add the Wi-Fi credentials to connect the Raspberry Pi and re-attach the micro SD card to the computer again, after ejecting it once. Click on the Micro SD card which is now ‘boot’ and open the file octopi-wpa-supplicant.txt.

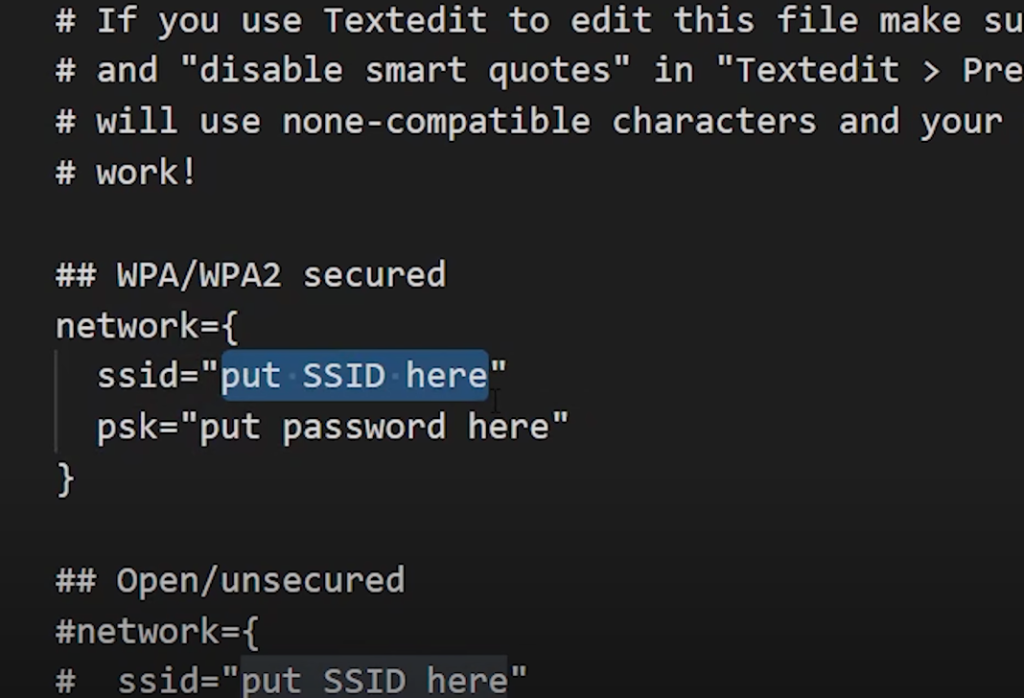
Use notepad to update the file that will not give you editing errors. Find the section ## WPA/WPA2 secured and delete the hashtags that are beneath the above statement.
Now, replace the SSID and PSK values as per the credentials of your Wi-Fi network.
Now, this section is for the country that you’re currently using it, bydefault it is set on UK, to change it further add a hash (#) and uncomment your current company. Here is an example below-
# Uncomment the country your Pi is in to activate Wifi in RaspberryPi 3 B+ and above
# For full list see: https://en.wikipedia.org/ wiki/ISO_3166-1_alpha-2
#country=GB # United Kingdom
#country=CA # Canada
#country=DE # Germany
#country=FR # France
country=US # United States
Again, after changing the above things, it’s time to unmount the SD card and remove it. Then, put it into your Raspberry Pi and boot it (may take around 10 minutes in the first go), and ensure about the Raspberry is running in it’s expected form. If you’re a Mac user, go to octopi.local in the browser, and for Windows users, click on the Network tab and look for OctaPrint. Double-click on it to open the dashboard in the browser.
Refer to the image above, if it is the same as yours, then you did the set up perfectly fine! If not, then the common issues can be your incorrect Wi-Fi details, processing of Raspberry Pi, out of ranged Wi-Fi from the Raspberry Pi, etc..
STEP-2 Print with OctaPrint
First is enable the connectivity check and plug-ins blacklist to ease the performance and improved stability. You may think to import a Cura profile now, but our suggestion is to skip it for the time being and begin the main process. So, start with inserting the details of your printers.
The print bed and build volume requires to be easily found, and if you are not handy with the measurements, then do it now by checking it from your Cura Printer profile. Rest Axes, Hotend & Extruder are pre-set and appeared to be fine for now (maybe need a change if you’ve changed your nozzle).
STEP-3 OctaPrint is Good with a Camera
Here, the crucial part will begin, after the set up of OctaPrint on Raspberry Pi is done. We’ll start printing, plug in the Raspberry Pi to the printer. While it is booting, open Octaprint in the browser, and click on the ‘Connect button for a spin. Then, set the hot end and bed temperature with the updated time.
With the help of the control tab, you’ll be able to access the motor controls, home commands to the axes, and camera stream. Then, there is a G-code viewer for your currently loaded model, a terminal through which it will send a G-code command to your printer. And the last tab is the time-lapse in the panel.
The use of the official Raspberry Pi Camera Module is the easiest way to set up video monitoring. There are some Octa-Print themes available but they are not supported officially. So it is suggested to use a USB webcam for high-quality videos.

We commend you to make the OctaPrint work in a way that we did in this whole process, and in the end, there is an upload file button in the bottom left, click and upload the G-code you wish to print.
Now, a file will appear that wills how the details about the print including the time it will take to print the object. Then, you’ll be able to see every respective layer of the object that is to be sliced and print from the 3D printer, just ensure about the correct G-code from the Viewer tab. Click on print, and you’ll see the print in a while.
Octalapse is one of the best and our favourite time-lapse maker. The reason is how beautifully it captures each layer as soon as it is finished. Though, Octaprint has community created plug-ins but this is still liked the most by us. The extruder smartly moves away so that the camera can capture a fine image at every step.
This way, your Octaprint will work!