The Arduino weather station project is one of the finest projects for monitoring and recording real-time temperature and humidity. It is a starter project requiring only a few components that are affordable and relatively easy to work with. You will end up having a fully functional weather station to track changes in the environment.
Materials Required
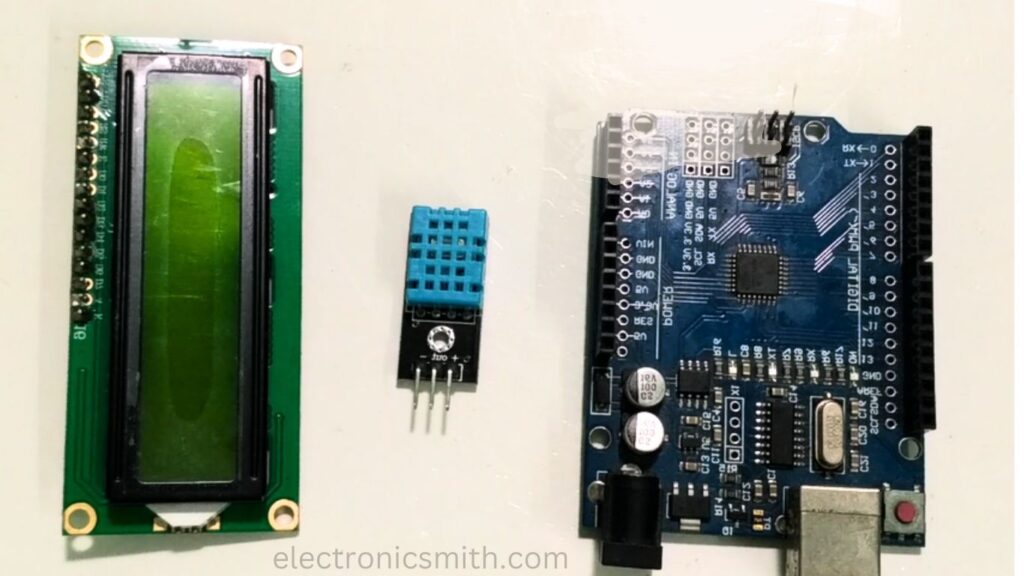
To get started, gather the following components:
| Name | Quantity |
| Arduino Uno | 1 |
| DHT11 Sensor | 1 |
| 16×2 LCD Display | 1 |
| I2C LCD Module | 1 |
| Jumper Wires | Various |
| Breadboard | 1 |
| Resistor (10kΩ) | 1 |
Optional Materials
- USB Cable: Upload codes from your computer to this Arduino..
- Power Supply: This allows the Arduino work independently of your computer-You can use a power pack or an adapter, for example.Create the Weather Station
Let’s Build the Weather Station
Step 1: Set Up the Hardware Connections

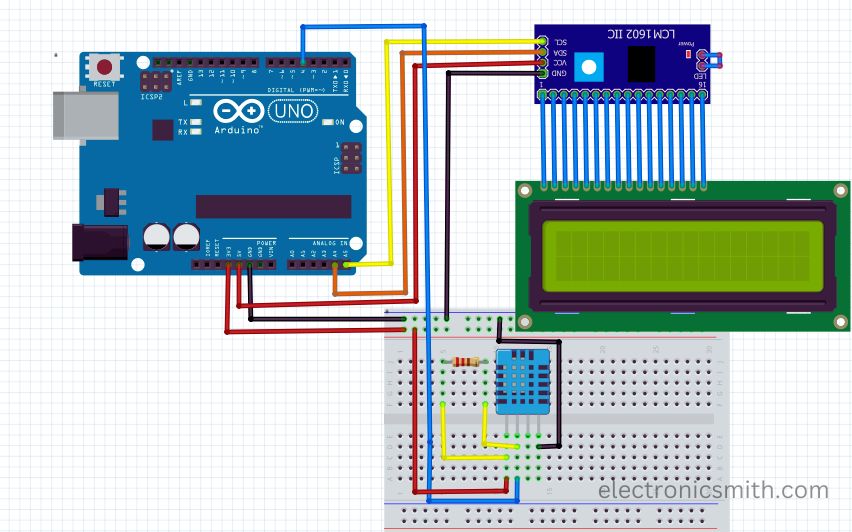
To begin with, all the parts should be hooked up to the Arduino using the following connections:
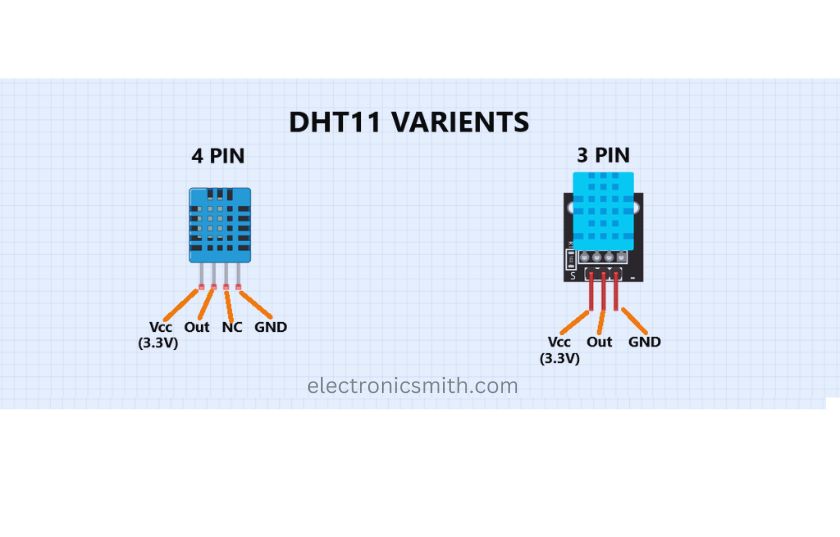
DHT11 Sensor This device has three pins: VCC (power), GND (ground), and Data (signal).
- Insert VCC into the 5V pin on Arduino
- Insert GND on the GND on the Arduino.
- Insert Data onto the digital pin 2 on the Arduino.
16×2 LCD Display with I2C Module: The I2C module is a small board that attaches to the back of the LCD, making wiring much simpler. You only need four instead of 12 connections.
- Connect VCC to 5V on the Arduino.
- Connect GND to GND on the Arduino.
- Connect SDA (data line) to A4 on the Arduino.
- Connect SCL (clock line) to A5 on the Arduino.

Designing Your Own Customized Printed Circuit Board

For designing PCB board we will need PCB designing software like Eagle, KiCad, or EasyEDA. You have to add the necessary connectors for the Raspberry Pi and the camera module, also ensure that the PCB size and dimensions fit your requirements. Once you design the layout of your printed circuit board, export the Gerber files from the software and upload it on PCBWay.com.
Do not forget to specify the PCB specs such as layers, dimensions, materials, and copper thickness, etc. Once you upload your Gerber files and choose your desired specs it’s now time to Place your order and make your payment.
Step 2: Install Necessary Libraries
Make sure that Arduino can talk with both the DHT11 sensor and the LCD by installing their respective libraries.

- Open the Arduino IDE.
- Navigate to Sketch > Include Library > Manage Libraries.
- Search for and install the following libraries:
- DHT Library: Allows the Arduino to communicate with the DHT11 sensor.
- LiquidCrystal_I2C Library: Enables communication with the LCD display using the I2C module.
Step 3: Writing and Uploading the Code
Now it’s time to write the code that will read data from the DHT11 sensor and display it on the LCD. Use the Arduino IDE for this.
- Open a new sketch in the Arduino IDE.
- Copy and paste the code below
#include <DHT.h>
#include <Wire.h>
#include <LiquidCrystal_I2C.h>
#define DHTPIN 2
#define DHTTYPE DHT11
DHT dht (DHTPIN, DHTTYPE);
LiquidCrystal_I2C lcd(0x27, 16, 2); // 0x27 is the I2C address for most LCDs
void setup() {
}
lcd.begin();
lcd.backlight(); // Turn on the LCD backlight for better visibility
dht.begin();
void loop() {
}
// Initialize the DHT sensor
// Reading temperature and humidity values float temp = dht.read Temperature();
float humidity = dht.readHumidity();
// Display temperature on the first row lcd.setCursor(0, 0);
lcd.print ("Temp: "); lcd.print (temp); lcd.print("C");
// Display humidity on the second row lcd.setCursor(0, 1);
lcd.print ("Humidity: ");
lcd.print (humidity); lcd.print("%");
delay(2000); // Update every 2 seconds
3. Connect the Arduino to your computer through the USB cable.
4. Select Arduino Uno under boards and your serial port in the IDE for uploading the code into it.
5. After all set, click Upload from the Arduino IDE
Once the code is uploaded, your Arduino should start reading data from the DHT11 sensor every two seconds and displaying it on the LCD.
Step 4: Powering the Arduino
Upload the code and you are good to go. You will decide how to power up your Arduino:
- Connected to Computer: If you let it sit there, just plugged in via the USB cable, the Arduino stays powered.
- External Power Supply: For standalone operation, connect a battery pack or a power adapter to the Arduino’s power jack.
Step 5: Testing and Calibrating the Weather Station
After the device is energized, the weather station should begin displaying temperature and humidity readings on the LCD. Here are a couple of testing steps to ascertain accuracy and performance:
- Test in Indoor: Place it indoors to measure ambient conditions of the room. Measure how it responds to sudden changes in temperature or humidity.
- Outdoor Testing: Place the station outside to measure environmental changes. It should be covered with something to protect it from direct rain or extreme weather since these may damage its components.
- Calibration: The DHT11 sensor is relatively accurate, but if you observe large variations, it may be necessary to calibrate it. Advanced users can add calibration functions in the code.
Step 6: Adding More Features (Optional)
Once you have the basic weather station working, consider adding other features for enhanced functionality:
- Additional Sensors: Add more sensors like a barometric pressure sensor or a light sensor for comprehensive environmental data.
- Data Logging: Use an SD card module to log temperature and humidity readings over time, which can then be analysed later.
- WIFI Connectivity: Integrate an ESP8266 WIFI module to send data to a cloud service or a mobile app, allowing remote monitoring of the weather station’s readings.
Conclusion
The procedure outlined above led you to build a very simple but effective weather station using Arduino. This example illustrates both how to program with Arduino and interface with sensors, and even more importantly, it introduces insights into building real-world applications. You could expand upon this setup by incorporating remote monitoring, data logging, or other sensors in order to build a very comprehensive environmental monitoring system.
