
pH measurement is utilized in many applications like agriculture, water testing, and in laboratory testing. Here in this article, we are going to study how to connect a pH sensor to Arduino Uno for pH reading measurement. We are going to discuss the required parts, sensor output, connection, and code. Working, Pin Output, and Onboard Components
Materials Required:
| Name | Quantity |
|---|---|
| Arduino Uno | 1 |
| 16×2 Alphanumeric LCD Display | 1 |
| I2C Module for LCD | 1 |
| Gravity Analog pH Sensor | 1 |
| Dupont Cables | As needed |
| Breadboard | 1 |
Hardware overview
Working
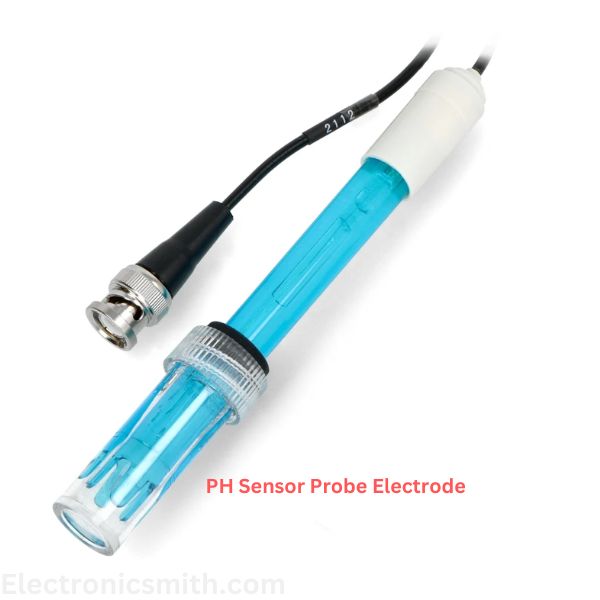
The pH Sensor resembles a rod, typically a glass material, with an end referred to as the “Glass membrane”. This membrane contains a known pH buffer solution (commonly pH = 7). This type of electrode maintains a constant binding of H+ ions on the inner surface of the glass membrane.
When the probe is immersed in the test solution, hydrogen ions from the test solution begin exchanging with other cations on the glass membrane, resulting in an electrochemical potential across the membrane. This potential is passed through the electronic amplifier module, which detects the potential between the two electrodes and quantitates it to pH units. The difference between the potentials decides the pH value according to the Nernst equation.
Nernst Equation
The Nernst equation provides a relationship among the cell potential of an electrochemical cell, temperature, reaction quotient, and standard cell potential. Under non-standard conditions, the Nernst equation can be employed in calculating cell potentials within an electrochemical cell. The Nernst equation is also employed in the calculation of the total electromotive force (EMF) for a complete electrochemical cell. This equation is also employed to determine the pH value of a solution. The response of the glass electrode is controlled by the Nernst Equation and can be expressed as:
E = E0 – (2.3 * RT / nF) * ln(Q)
Where:
- Q = Reaction coefficient
- E = mV output from the electrode
- E0 = Zero offset for the electrode
- R = Ideal gas constant = 8.314 J/mol-K
- T = Temperature in ºK
- F = Faraday constant = 95,484.56 C/mol
- N = Ionic Charge
On Boards Components
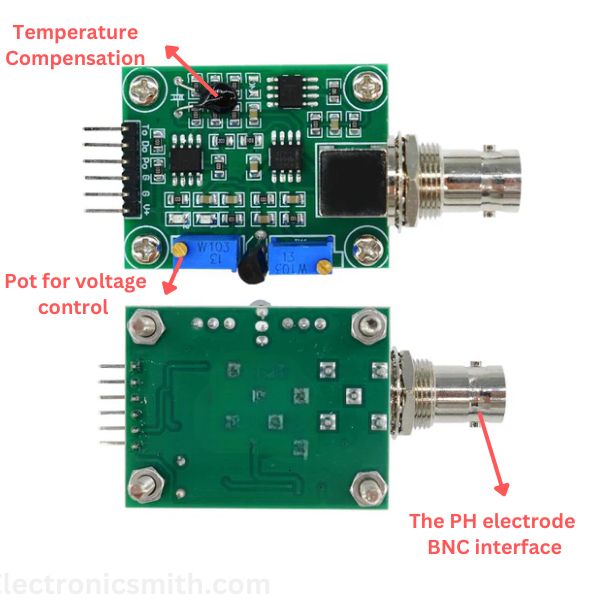
PH Electrode BNC interface: A General connector used in joining a pH probe safely with the circuit to relay the signal.
Features:
- Supply Voltage: 3.3~5.5V
- Output Voltage: 0~3.0V
- Probe Connector: BNC
- Signal Connector: PH2.0-3P
- Measurement Accuracy: ±0.1@25℃
- Dimension: 42mm*32mm/1.66*1.26in
Pinout

- V+: 5V DC input
- G: Ground pin
- Po: pH analog output
- Do: 3.3V DC output
- To: Temperature output
Connection

The interfacing process for both pH sensors is easy. Employ proper calibration and wiring for accurate measurements.
Connecting the Gravity Analog pH Sensor to Arduino:
Connect the VCC of the sensor to the 5V pin of the Arduino.
Breadboard the Arduino GND to the GND of the sensor.
Connect the signal pin of the sensor to A0 of Arduino.
Mounting the LCD Display onto the I2C Module:
Connect the 5V and GND of the display to the 5V and GND of Arduino.
Connect CLK (Clock Line) to A5 of Arduino.
Connect DAT (Data Line) to A4 of Arduino.
Coding
Once all the connections are made install the Arduino IDE on your system
#include <Wire.h>
#include <LiquidCrystal_I2C.h>
#include <OneWire.h>
#include <DallasTemperature.h>

#define ONE_WIRE_BUS 2  // Pin for temperature sensor (DS18B20)
OneWire oneWire(ONE_WIRE_BUS);
DallasTemperature sensors(&oneWire);

LiquidCrystal_I2C lcd(0x27, 16, 2);

float calibration_value = 21.34;  // pH Calibration Value
int buffer_arr[10], temp;
unsigned long int avgval;

void setup() {
  Serial.begin(9600);
  lcd.init();
  lcd.begin(16, 2);
  lcd.backlight();
  lcd.setCursor(0, 0);
  lcd.print("   Welcome to");
  lcd.setCursor(0, 1);
  lcd.print(" Circuit Digest");
  delay(2000);
  lcd.clear();

  sensors.begin();  // Initialize temperature sensor
}

void loop() {
  // Read temperature from DS18B20
  sensors.requestTemperatures();
  float tempC = sensors.getTempCByIndex(0);  // Read temperature in °C
  if (tempC == DEVICE_DISCONNECTED_C) {
    tempC = 25.0;  // Default to 25°C if sensor fails
  }

  // Convert Celsius to Kelvin
  float tempK = tempC + 273.15;

  // Read pH sensor values
  for(int i = 0; i < 10; i++) {
    buffer_arr[i] = analogRead(A0);
    delay(30);
  }

  // Sort the buffer array (Bubble Sort)
  for(int i = 0; i < 9; i++) {
    for(int j = i + 1; j < 10; j++) {
      if(buffer_arr[i] > buffer_arr[j]) {
        temp = buffer_arr[i];
        buffer_arr[i] = buffer_arr[j];
        buffer_arr[j] = temp;
      }
    }
  }

  // Calculate the average of the middle values
  avgval = 0;
  for(int i = 2; i < 8; i++) {
    avgval += buffer_arr[i];
  }

  // Convert to voltage
  float volt = (float)avgval * 5.0 / 1024 / 6;

  // Constants for the Nernst Equation
  float R = 8.314;    // Gas constant (J/mol·K)
  float F = 96485;    // Faraday's constant (C/mol)
  float E0 = calibration_value;  // Calibration offset

  // Calculate pH using Nernst Equation
  float ph_act = (E0 - volt) / ((R * tempK) / (F * 2.303));

  // Display pH value
  lcd.setCursor(0, 0);
  lcd.print("pH Val: ");
  lcd.setCursor(7, 0);
  lcd.print(ph_act, 2);  // Print with 2 decimal places

  // Display temperature
  lcd.setCursor(0, 1);
  lcd.print("Temp: ");
  lcd.setCursor(6, 1);
  lcd.print(tempC, 1);
  lcd.print(" C");

  delay(1000);
}
Conclusion:
Thanks for reading this tutorial! Hopefully, you have become aware of how to measure pH with Arduino and a pH sensor. If you found it helpful, do not hesitate to leave a comment below