
The joysticks are one of the well-known controllers. They are primarily used for controlling movement. And the best thing about it is that it’s used in game-controlling devices. Also, they are used in other devices but the primary function and role played by the joysticks are the controlling movements.
The information about it might be helpful for the gaming content, so it’s essential to have a strong understanding of it. In this article, you will get all the information about How 2-Axis Joystick Works & interfaces with Arduino + Processing. By the end, you would know about it all.
Working
Two potentiometers and a gimbal mechanism are the foundation for how the regular joystick module operates. The Arduino board can more easily discern the Joystick’s position (right, left, up, and down) thanks to these two methods. very much similar to Rotary Encoder but it regains its original place.
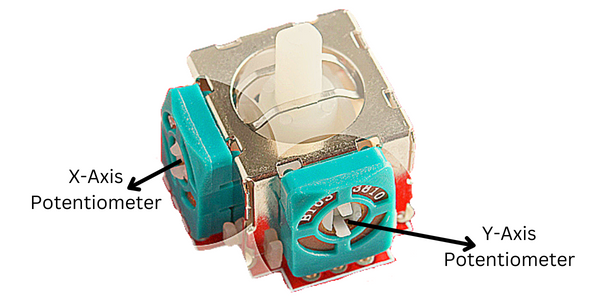
Each shaft of the Joystick is attached to a separate potentiometer. These help to establish the rod’s location. The Arduino board’s analog values are translated into the position. As the physical position of the joystick is changed, the resistance of the potentiometer varies. They contain 5 channels of internal analog to digital converters. The only Arduino analog pins that can be used to measure analog signals are these.
A rod-type structure is settled in two shafts, and this is the one that is rotated. As the two axes are available, one is the reason for the motion of the X-axis and the second one is the reason for the movement of the Y-axis. This is the simple principle on which it works.
Hardware overview
The Joystick module is a fundamental self-centred spring-loaded module. It comprises a push button and two variable resistors. Pushbutton output can be either low state or high state, while variable resistor output is in the form of analog voltage.
A potentiometer controls the x-axis, and another potentiometer controls the y-axis. The Joystick has two 10k potentiometers, one for each axis, that give changeable voltage, which is a crucial point to remember.
The joystick module intends to give a microcontroller two-dimensional (x- and y-axis) motion. The push button at the centre is used to control the z-axis. When you depress the black cap, it turns on. This joystick module is similar to the PS2 available popularly.

Features
The feature of this module includes the following:
- This module can also be interfaced with an Arduino microcontroller.
- This module can also be used to control robotic devices.
- They can also be interfaced with Arduino microcontrollers.
Pinout
Consisting of the 5 pins in the module, it works. Here are the details that are to be known:

GND, with its abbreviation, is connected to the ground terminal of Arduino or any other attached.
VCC, available in the Arduino, connects it to the 5-volt pin of it.
VRx provides voltage to the Joystick as well as manages the axis position of the joysticks,i.e., X- coordinate.
VRy, which provides voltage to the Joystick as well as manages the axis position of the joysticks,i.e., Y- coordinate.
SW is the centre switch. It is the output release from the switch. When released, the output is high, and when clicked, the output is low.
Material required
| S. No. | Components | Quantity |
| 1. | Arduino UNO | 1 |
| 2. | Dual-axis XY Joystick Module | 1 |
| 3. | Male to Female jumper wire | as per requirement |
Circuit connection
The information required for the use of this module must be clear from the above-given points.
To interface the joystick with the Arduino, we’ll need to use analog input pins. The X and Y axis of the joystick is connected to analog input pins A0 and A1, respectively. In order to use the joystick, we’ll need to read the analog input values and convert them to digital values that the Arduino can understand.

In short, simple words wiring up the 2-Axis Joystick is pretty easy. Just connect the +5V and GND pins to your Arduino’s power supply, and connect the X and Y axis pins to analog inputs 0 and 1.
Code
Copy and upload the following code on your Arduino.
// check www.electronicsmith.com
//for more cool electronics projects

const int SW_pin = 8; // digital pin connected to switch output
const int X_pin = 0; // analog pin connected to X output
const int Y_pin = 1; // analog pin connected to Y output

void setup() {
  pinMode(SW_pin, INPUT);
  digitalWrite(SW_pin, HIGH);
  Serial.begin(9600);
}

void loop() {
  Serial.print("Switch:  ");
  Serial.print(digitalRead(SW_pin));
  Serial.print(" | ");
  Serial.print("X-axis: ");
  Serial.print(analogRead(X_pin));
  Serial.print(" | ");
  Serial.print("Y-axis: ");
  Serial.print(analogRead(Y_pin));
  Serial.println(" | ");
  delay(200);
}
FAQ
What is a 2-axis joystick?
A 2-axis joystick is a joystick that has two degrees of freedom. This means that it can move in two directions. The two directions are typically up and down, or left and right.
How do I interface a 2-axis joystick with Arduino?
There are a few different ways to interface a 2-axis joystick with Arduino. The most common way is to use an Analog Joystick. This is the type of joystick that has a pot for each axis. Another way to interface a 2-axis joystick with Arduino is to use a Digital Joystick. This type of joystick uses
switches instead of pots.
How do two-axis joysticks function?
The Y-axis shaft pivots to the left and right when the stick is tilted forward and backward. The X-axis shaft pivots when it is tilted left to right. Both shafts pivot as you move the stick in a diagonal motion. Each joystick shaft has a potentiometer attached, which interprets the rod position as analog measurements.
A joystick has how many axes?
A joystick must measure its location on the X-axis (left to right) and the Y-axis to transmit to the computer the full range of motion (up and down). The stick is precisely located using the X-Y coordinates, much like in elementary geometry.
What does a joystick output mean?
The output value of the X terminal and Y terminal is Center (2.5V) of the designated range when the Joystick is in the idle position (0V to 5V). The output values fluctuate between the lowest limit (0 V) and the maximum limit in response to holder movement (5V).
What do a controller’s axes represent?
The joystick value for turning left or right is the X-Axis. The joystick value for moving forward and backward is the Y-Axis. The joystick value can be flipped between positive and negative using the X-Invert and Y-Invert commands.
1 thought on “How 2-Axis Joystick Works & Interface with Arduino”