
Water is a basic need in everyone’s life but conserving water and its proper maintenance is very important. The rain sensor here helps to detect the rain in the agriculture field and generates an alarm whenever there is rain so we can take some quick actions to conserve water and the crops.
The rain sensor detects the rain and gives awareness to concerned persons in different fields like irrigation, home, automobile, communication, etc.
Working of sensor
The rain sensor module working is very simple to understand. The dryness on the rain board module on a sunny day offers high resistance to the supply voltage. This voltage becomes visible on the output pin of the rain board module as 5v.
This 5v is studied as 1023 if studied by an analog pin of the Arduino. The rainwater causes an increase in the wetness of the raining board, During rain which in turn results in a decrease in the resistance offered for the supply. The output voltage starts to decrease as the resistance decreases gradually.
When the raining board is fully wet and the resistance offered is minimum, the output voltage will be as low as possible(approx 0). The 0V is studied as a 0 value if studied by an analog pin of the Arduino. If the rain board module is moist, the output of this rain board module will be concerning the resistance it offers.
The rain board module offers resistance in such a way that the output is 3v; the studied analog value will be 613. To find ADC, the formula is given by ADC = ( analog voltage value ×1023) /5. We can use this formula to convert any analog voltage to the Arduino analog study value.
Sensor physical appearance
A rain sensor mainly has two components
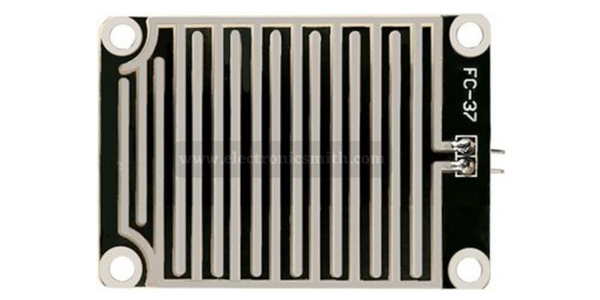
SENSING PAD
The sensor contains a sensing pad with a sequence of exposed copper traces put out in the open, maybe over the roof or where it can be simulated by rainfall. Usually, these traces are not joined but bridged by water. very much similar to a water level indicator sensor.
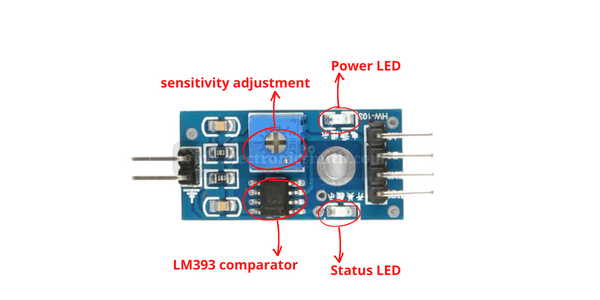
THE MODULE
It joins the sensing pad to the Arduino. The module gives an output voltage according to the resistance of the sensing pad and is made available at an analog output (AO) pin.
Pinout
The rain sensor only has 4 pins to connect.
AO: (ANALOG OUTPUT) = pin gives us an analog signal joining the supply value 5v to 0v.
DO: (DIGITAL OUTPUT) = pin gives the digital product of the internal comparator circuit. You can attach it to any digital pin on an Arduino Or directly to a 5v relay or the same device.
GND: is a ground connection
VCC: pin gives power to the sensor. It is suggested to strengthen the sensor joining 3.3 v – 5v.
Material required
| S. No | Items | Units |
| 1 | Rain sensor | 1 |
| 2 | Breadboard | 1 |
| 3 | Connecting wires | As per requirement |
| 5 | Arduino UNO | 1 |
Circuit connection
The rain gauge module is connected to the control board. The ground pin is attached to the ground. The control board’s VCC is attached to the 5v supply. If required, the DO pin is attached to the digital pin 7 of the Arduino, and that pin must be stated as an output pin in the program. The difficulty we face with the DO pin is that we can’t get the exact value of the output voltage.

The control module can sense the change in the output if the output crosses the threshold voltage. We need to operate the buzzer, even if there is a considerable switch in the output voltage in the rain board module. For these reasons, the A0 pin is connected to the analog pin of the Arduino, which makes monitoring the change in output easy.
The buzzer, which is used as a signal to the user, can be joined to any digital pin of the Arduino. If the buzzer needs more than 5v, try to attach a relay circuit or a transistor and then join the load.
Code
The Arduino code for the rain sensor was authored using the Arduino IDE.
// visit www.electronicsmith.com for more cool projects and tutorials
// Sensor pins
#define sensorPower 7
#define sensorPin 8

void setup() {
	pinMode(sensorPower, OUTPUT);

	// Initially keep the sensor OFF
	digitalWrite(sensorPower, LOW);

	Serial.begin(9600);
}

void loop() {
	//get the reading from the function below and print it
	int val = readSensor();
	Serial.print("Digital Output: ");
	Serial.println(val);

	// Determine status of rain
	if (val) {
		Serial.println("Status: Clear");
	} else {
		Serial.println("Status: It's raining");
	}

	delay(1000);	// Take a reading every second
	Serial.println();
}

//  This function returns the sensor output
int readSensor() {
	digitalWrite(sensorPower, HIGH);	// Turn the sensor ON
	delay(10);							// Allow power to settle
	int val = digitalRead(sensorPin);	// Read the sensor output
	digitalWrite(sensorPower, LOW);		// Turn the sensor OFF
	return val;							// Return the value
}
FAQ
- How does a rain sensor work?
Ans- In most cases, a rain sensor acts as a simple on/off switch. As moisture absorbing disks enlarge, they activate a switch that interrupts the circuit from the controller to the solenoid valves. Once the rain sensor has dried out, the switch disbands – this allows for normal operation.
2. What is a rain sensor?
Ans- A rain sensor is a switching device activated by rainfall that helps to detect rain.