Step 1: Setting Up the Raspberry Pi
In this step, the Raspberry Pi operating system would be configured such that it could host voice recognition software and hardware connections successfully.
1.1 Download and install Raspberry Pi OS
- Download Raspberry Pi Imager: Go to the Raspberry Pi Downloads page and download the Raspberry Pi Imager from there.
- Install Raspberry Pi OS:
- Insert your microSD card into your computer. Open Raspberry Pi Imager and then choose Raspberry Pi OS Lite for a lightweight installation.
- Select the microSD card and click on “Write” to flash the OS.
- Once flashing is done, plug the microSD to your Raspberry Pi, connect the monitor, keyboard, as well as your power supply, and start booting it.
1.2 Update Raspberry Pi OS
After booting up:
- Open the terminal and run the following commands to update the system:
sudo apt update

sudo apt upgrade
1.3 Install Required Packages
You’ll need several packages to enable voice recognition, GPIO control, and audio feedback:
- Pocketsphinx (for offline voice recognition)
- Python GPIO library (to control the relay)
- Espeak (for voice feedback)
Install the packages with:
sudo apt install pocketsphinx pulseaudio python3-pyaudio python3-pip

sudo pip3 install RPi.GPIO

sudo apt install espeak
Step 2: Setting Up the Hardware
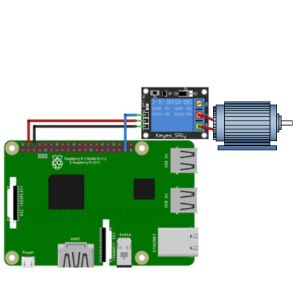
All the hardware will be connected to the Raspberry Pi for voice control and microphone input testing.
2.1 Relay Configuration
- Relay Basics: A relay is an electrically controlled switch used to control devices, like lights or fans, with the Raspberry Pi.
- Connections:
| Relay Module Pin | Connection Description | Raspberry Pi Pin/Device |
|---|
| VCC | Power supply for the relay module | 5V pin on the Raspberry Pi |
| GND | Ground connection for the relay module | GND pin on the Raspberry Pi |
| IN1 | Signal pin to control the relay | GPIO 18 on the Raspberry Pi |
| NO (Normally Open) | Output pin to the controlled device | Connected to the device’s live wire |
| COM | Common pin for the controlled device | Connected to the device’s power supply |

- Ensure the Raspberry Pi is off when connecting the relay to the circuit to avoid short circuits.
2.2 Microphone Installation
- Connect the USB microphone to one of the available USB ports in the Raspberry Pi.
- Testing the microphone:
| Command | Description |
|---|
arecord -l | Lists the available audio capture devices. |
arecord -D plughw:1,0 -d 5 test.wav | Records a 5-second audio file (test.wav) using device plughw:1,0. |
aplay test.wav | Plays back the recorded audio file (test.wav). |
Step 3: Installing and Configuring Pocketsphinx
Install the core software of the offline voice recognition
3.1 Get External Dependencies
Pocketsphinx requires a few extra libraries
- Swig: A tool which produces interfaces of several programming languages to C/C++.
- Libpulse-dev: For handling audio input/output.
Fit them with:
sudo apt install swig libpulse-dev
3.2 Test Pocketsphinx Set-up
To guarantee Pocketsphinx can work:
pocketsphinx_continuous -inmic yes
- Say some words, and the shell should identify and print them in the terminal.
Step 4: Writing the Python Script
Python Programming Code This is the core step where you will code your Python script for voice recognition and the actuation of GPIO pins control.
4.1 Write the Python Script
- Create a new file in your terminal.:
- In the terminal, create a new Python file:
- nano voice_control.py
4.2 Add the Python Code
Here is the elaboration of the code :
import os import time
import RPi.GPIO as GPIO
from pocketsphinx import LiveSpeech
# GPIO setup
GPIO.setmode (GPIO. BCM) # Use Broadcom pin numbering
LIGHT_PIN = 18 # Pin connected to the relay
GPIO.setup(LIGHT_PIN, GPIO.OUT)
GPIO.output (LIGHT_PIN, GPIO.LOW) # Initialize light to be off
# Function for voice feedback
def speak_feedback(text):
os.system(f'espeak "{text}"')
# Initialize voice recognition
speech = LiveSpeech (1m=False, keyphrase='turn on light', kws_threshold=1e-20)
# Function to listen for commands
def listen_for_commands():
print("Listening for commands...") speak_feedback("Listening for commands")
for phrase in speech:
command = str(phrase).lower()
print (f"Command received: {command}")
if 'turn on light' in command:
print("Turning on light")
GPIO.output (LIGHT PIN, GPIO.HIGH) # Turn light on speak_feedback("Light turned on")
elif 'turn off light' in command:
print("Turning off light")
GPIO.output (LIGHT_PIN, GPIO. LOW) # Turn light off speak_feedback ("Light turned off")
# Main function to start the listener
try:
listen_for_commands()
except Keyboard Interrupt:
print("Exiting program...")
finally:
GPIO.cleanup() # Clean up GPIO when exiting
Step 5: Executing Python Code
Test and validate the Python script. This is to make sure voice commands are correctly recognized and executed.executed.
5.1 Running the Script
- To execute the script:
- python3 voice_control.py
- Testing Command:
- Say “turn on light” → The light should turn on.
- Say “turn off light” → The light should turn off.
- You should hear audio feedback with each command, confirming the action.
Step 6: Adding Additional Commands
Adding Additional Commands Expand your system in the control of many devices with additional voice commands. handling additional voice commands.
6.1 Adding Commands for More Devices
- Example Update Control an attached fan connected on GPIO pin 23
# Additional GPIO setup for the fan
FAN_PIN = 23 # Pin connected to the fan relay
GPIO.setup(FAN_PIN, GPIO.OUT)
GPIO.output (FAN_PIN, GPIO. LOW) # Initialize fan to be off
# Update the listen_for_commands function:
def listen_for_commands():
print("Listening for commands...") speak_feedback ("Listening for commands")
for phrase in speech:
command = str(phrase). lower()
print (f"Command received: {command}")
if 'turn on light' in command: print("Turning on light")
GPIO.output (LIGHT_PIN, GPIO.HIGH) speak_feedback ("Light turned on")
elif 'turn off light' in command: print("Turning off light") GPIO.output (LIGHT_PIN, GPIO.LOW) speak_feedback("Light turned off")
elif 'turn on fan' in command:
print("Turning on fan")
GPIO.output (FAN_PIN, GPIO.HIGH) speak_feedback("Fan turned on")
elif 'turn off fan' in command: print("Turning off fan")
GPIO.output (FAN_PIN, GPIO. LOW)
speak_feedback ("Fan turned off")
Connections:
| Component | Connection Pin/Description | Raspberry Pi Pin/Port |
|---|
| Relay Module | VCC (Power) | 5V |
| GND (Ground) | GND |
| IN1 (Control Signal) | GPIO 18 |
| NO (Normally Open) | Device’s live wire |
| COM (Common) | Device’s power supply |
| USB Microphone | Plug into any available USB port | USB Port |
| GPIO Pins | Light Control | GPIO 18 |
| Fan Control | GPIO 23 |
Step 7: Automate Script on Boot
Make sure your script runs automatically each time the Raspberry Pi starts.
7.1 How to Create a Cron Job
- Open Crontab:
- crontab -e
- Add this line to execute the script on startup:
- @reboot python3 /home/pi/voice_control.py &
- Save and Exit: This ensures the script will execute whenever the Raspberry Pi is rebooted.
Frequently asked questions:
Q1. What if the microSD card is facing problems while functioning?
A. Make sure it’s properly inserted and test various card readers or microSD cards if that is likely the problem.
Q2. How will I know if the OS is installed properly or not?
A. The Raspberry Pi Imager will then display a “Write Successful” message after the installation is complete.
Q3. What if the Rasberry Pi isn’t booting properly?
A. The microSD card is properly fitted. All cables, like the power, monitor, and keyboard are securely connected. Also if you’re using a compatible power supply.
Conclusion
Your offline voice recognition-based home automation system is ready! Experiment with more appliances, sensors, or customized commands to expand its capabilities.

1 thought on “Offline Voice Recognition-Based Home Automation System”