
In everyday life, we have seen many of the new SBCs (Single Board Computers) getting released and one of the most used SBCs is beaglebone which is no less than a computer as it has almost every functionality and is capable of performing almost every operation which can be performed using the computer or any laptop. It is the reason why Beaglebone is one of the most demanded Single board computers or SBC. Beaglebone SBC is developed by its parent company Texas Instruments and it is available on the internet for buying. The Beaglebone Board is an open hardware single-board computer.
The Beaglebone focuses on a different and difficult segment of the market so there is performance guaranteed. It is an engineering-focused board as well as it is a cost-efficient board. Beaglebone comes with a compact package consisting of a processor, memory, graphic acceleration, etc. One more extraordinary functionality which Beaglebone has is that it does not require any extra operating system to be installed by the user as it comes with a Debian version of Linux in which a Linux terminal is available which is then used to run common Linux commands and operate it as per requirement.
That is all in the introduction of the Beaglebone, let us now have a look at the features of the Beaglebone board
Features of the Beaglebone board
Some of the most common features which you can see in the other versions of the Beaglebone board are as follows:
| 256MB DDR2 RAM |
| 3D graphics accelerator |
| ARM Cortex-M3 for power management |
| 2x PRU 32-bit RISC CPUs |
| USB client: power, debug and device |
| USB Host |
| Ethernet |
| 2x 46 pin headers |
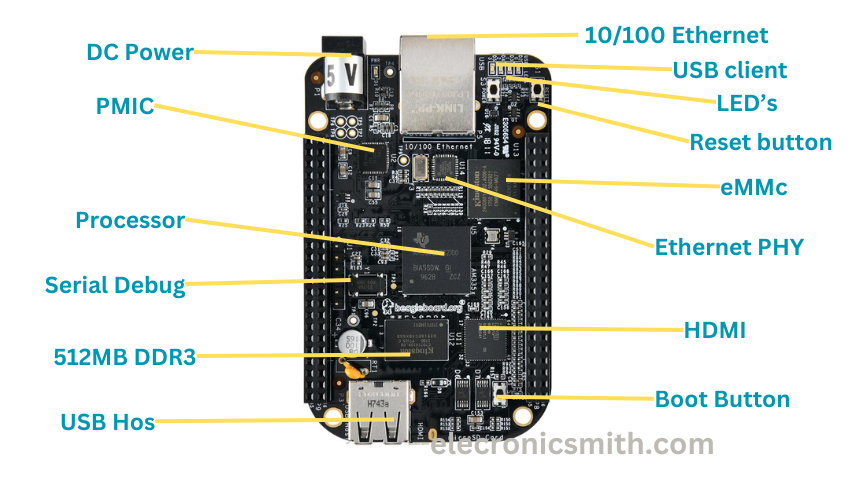
As you can see the Beaglebone board is almost similar to Raspberry Pi and has a compact size like a credit card. Also, its structure is somewhat like an Arduino which makes it easy to attach this to any project to enhance its capability.

That is all in the features of the Beaglebone board, let us now have a look at the use of this board.
Requirements
The requirements required for getting started with Beaglebone are mentioned below:-
- Beaglebone board – You can use any of the variants of the Beaglebone boards such as Beaglebone Black, Beaglebone Green, etc.
- Power supply – For starting up the Beaglebone board you will need a power supply of 5V. For this purpose, you can use a USB cable or a power adapter.
- MicroSD card – For booting up the Beaglebone board you will require a MicroSD card of at least 4 GB storage.
- Computer – You’ll need a computer to set up the Beaglebone board and interact with it. Beaglebone supports various operating systems, including Linux and Windows.
- Internet Connection – For downloading Software, updates, and other important documentation you will need a stable internet connection.
- Optional Components – You will also require actuators, sensors, LED, and jumper wires depending upon your project.
That is all in the requirements, let us now have a look at how to set up a Beaglebone board.
Software Requirement of Beaglebone
Whether you are using Windows or Mac, the recommended software mentioned in the official documentation is Balena Etcher. You will also need an SSH or Secure Shell which is built on Mac or Linux while for Windows you will have to download PuTTY which is available to download for free.
The latest Linux image for the BBB(Block Based Backup) is also required. You can download it from the official Beaglebone website.
How to set up a Beaglebone board?
For setting up a Beaglebone board you only have to follow the steps which are mentioned below:
- Connect your Beaglebone board using the USB cable to your Laptop or PC
The first step in setting up any Beaglebone board is connecting it to your laptop or PC with the help of a USB cable. Once you connect your Beaglebone board, it will start to boot using the operating system on the eMMC storage.
- Log in to the OS
For logging in into the operating system the beaglebone board has to connect to a network which is provided by the drivers. These drivers are provided by the Beagleboard manufacturers. Drivers allow us to create a local network between the beaglebone board and the laptop or PC when we connect it via the USB cable.
- Download the drivers
To download the driver you need to follow the steps mentioned below:
- Go to Beaglebone’s official website to download drivers
- Now, download the driver package according to your operating system.
- Once the installation of the driver is complete, click on Finish.
- After the completion of the installation of the driver, you have to restart your PC. Also, make sure that there is no Ethernet connected to your Laptop and that the Wi-Fi on your laptop is off and also. This step is important as after this step the Beaglebone board device drivers will try to create a LAN connection between your laptop or PC and the Beaglebone board so that you can access the web server running by default on the board and to test if it’s all good, up, and running.
4. Connect to the web servers running on Beaglebone board
Click and open any web browser and then enter the IP address 192.68.7.2 on the URL bar. (We are using beaglebone black to demonstrate this setup so we are using this IP address which is the default static IP assigned to BeagleBone Black). If there is a green check mark available with the message then it means that your board is connected successfully.
5. Checking the connection
Now after visiting the IP address which is mentioned above you can see a menu at the left hand side in which multiple options are available. From the available options select Bonescript then you can see multiple examples which are written in the Bonescript programming language. You can click on any of the available examples to control the working of the Beaglebone board.
As mentioned earlier, the code which you will see in the examples is based on a JavaScript library called “BoneScript ” which is built by the Beaglebone makers. Once you select the desired example for checking the connection of your Beaglebone board now all you have to do is to click on the Run button. After clicking on the run button the code will run and your Beaglebone board will act accordingly.
In the bonescript code some general terms which are being used too often are illustrated as follows:-
PinMode function which defines the on board LED pins as outputs, similarly the digitalWrite function in the code is used to set the state of the output which can be either as HIGH or LOW. Then the setTimeout is used to restore the LEDs back to their normal functioning after the setTimeout, which clearly means that the program will stop running after the time that was set in the setTimeout function.
That is all in setting up your Beaglebone board, let us now have a look at how to install an operating system in your Beaglebone board. If you still have any queries left then no need to worry as we have added some frequently asked questions below:
Frequently Asked Questions
Q1 – What programming languages can I use for BeagleBone development?
BeagleBone supports various programming languages including Python, C, C++, and more. The choice of language often depends on your application and personal preferences.
Q2 – Does every Beaglebone board have wifi?
No, not every version of the BeagleBone board comes with built-in Wi-Fi. The availability of Wi-Fi depends on the specific model or version of the BeagleBone board.
Q3 – How is BeagleBone different from other single-board computers like Raspberry Pi?
BeagleBone generally offers more I/O pins than other SBC and it features real-time processing capabilities which makes it suitable for different types of applications.