A push button is a type of switch that connects two points. For Example Led turn on when you press the button. It turns off when you release the Push-button.
Material Required
| Component name | Quantity |
| Arduino | 1 |
| LED | 1 |
| 10k Resistor | 1 |
| 220ohm Resistor | 1 |
| Jumper wired | as per requirement |
| Breadboard | 1 |
| Push Button | 1 |
Push Button
When the button is not pressed there is no connection between legs you will get a low output. When the button is pressed, it makes the circuit complete and you will get a high output.

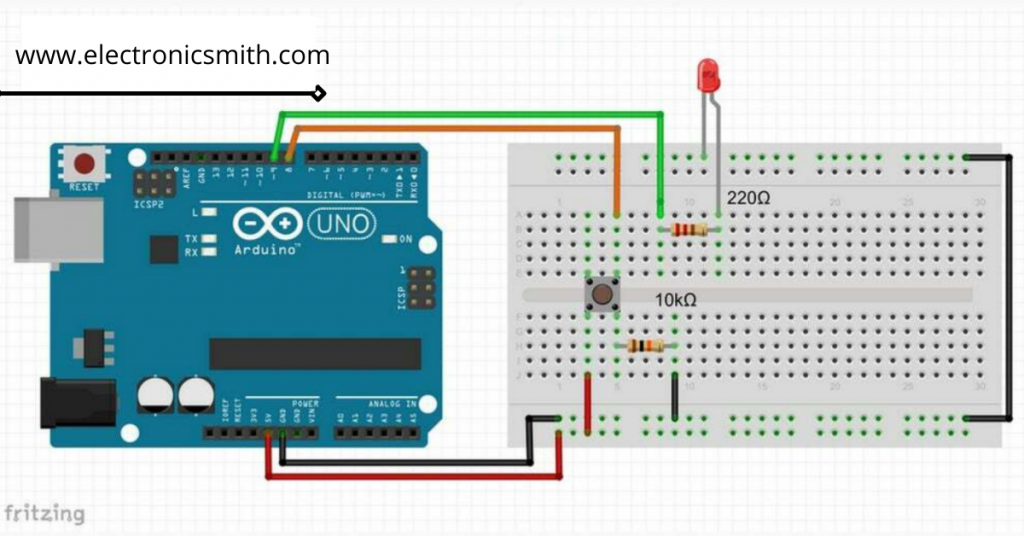
Circuit and connection
- Connect one end of the push button to Arduino pin 8. Connect the other end of the pushbutton to the 10k ohm resistor (pull down) and then to +5V, the other end of the resistor to ground. As shown in the diagram.
- There is a series connection of the Positive end of the LED and 220-ohm resistor to Arduino pin 9. The negative leg of LED should be connected to the ground.
Code
- Copy the following code and upload it to your Arduino.
int ledPin = 9; // choose the pin for the LED
int inPin = 8;   // choose the input pin (for a pushbutton)
int val = 0;     // variable for reading the pin status

void setup() {
  pinMode(ledPin, OUTPUT);  // declare LED as output
  pinMode(inPin, INPUT);    // declare pushbutton as input
}

void loop(){
  val = digitalRead(inPin);  // read input value
  if (val == HIGH) {         // check if the input is HIGH (button released)
    digitalWrite(ledPin, LOW);  // turn LED OFF
  } else {
    digitalWrite(ledPin, HIGH);  // turn LED ON
  }
}
- In the program below, the first thing you do is to initialize pin 9 as an output pin with pinMode( ) function in setup( ) routine.
- The loop( ) routine runs over and over again, forever. In the main loop, you read the state of button (pressed=high, unpressed=low) and you store it in buttonState variable. When button pressed once, the led turns on, and when pressed twice, the led turns off.